Zoho Payroll is a complete cloud-based salary processing solution designed to meet the compliance and computation needs of small-to-medium companies in India. For businesses operating within the Zoho environment, this platform serves as a natural extension of the core HR infrastructure. By integrating salary processing directly with employee profiles, attendance records, and accounting ledgers, Zoho Payroll removes the friction of manual data handling. This guide walks you through setting up Zoho Payroll for an Indian business from scratch, configuring statutory deductions, establishing salary structures, adding employee registries, and executing your monthly pay runs.
What Zoho Payroll does
Zoho Payroll is built to automate the end-to-end payroll cycle for growing companies. The platform computes gross earnings, processes statutory deductions (including EPF, ESI, Professional Tax, and TDS), generates detailed digital payslips, and prepares statutory filing returns. By integrating with Zoho People, employee records sync automatically. Furthermore, connection with Zoho Books ensures that all payroll expenses, allowances, and statutory liabilities are recorded in your general ledger without manual journal entries.
Zoho Payroll compared to competitors (greytHR, Keka, and RazorpayX)
When selecting a payroll platform in India, businesses often evaluate Zoho Payroll against other popular tools such as greytHR, Keka, and RazorpayX Payroll. While each of these platforms computes taxes and handles statutory deductions, Zoho Payroll stands out as the most value-for-money solution for growing companies, especially those already using other Zoho applications.
- greytHR: A widely used system that excels in structured employee self-service and statutory compliance. However, greytHR can become expensive as you scale. Many features require separate add-on subscriptions, and setting up integrations with external accounting platforms often requires manual file exports or custom API development.
- Keka: Known for its beautiful user interface and comprehensive HRMS modules, including performance management and time tracking. While highly detailed, Keka is premium-priced and may represent a budget overkill for small-to-medium enterprises that only need straightforward payroll processing and core compliance.
- RazorpayX Payroll: Offers a highly automated payroll experience with built-in banking payouts. While simple to use, it lacks the deep, multi-module corporate registry and accounting ledger integrations required by mature finance teams.
Why the Zoho ecosystem represents the ultimate value for money
For any company already utilizing Zoho tools, choosing Zoho Payroll is a logical financial and administrative decision. The true value lies in how it integrates natively within the broader Zoho environment, creating a unified operations hub:
- Natively Synced HR and Attendance: By linking with Zoho People, new employee profiles, departments, work locations, and monthly loss-of-pay details flow automatically into your salary sheets. You do not need to pay for external middleware connectors or spend days manually mapping files.
- Automated Ledger Bookkeeping: Integrating with Zoho Books ensures that salary expenses, EPF liabilities, and TDS provisions are posted to your general ledger instantly. This removes manual journal entry errors and keeps your profit-and-loss statements accurate in real-time.
- Frictionless Employee Reimbursements: Connecting with Zoho Expense allows travel and business expenditure claims to be paid directly alongside salaries as non-taxable reimbursements, keeping your operational workflows self-contained.
By eliminating third-party API fees, custom developer costs, and manual bookkeeping overheads, Zoho Payroll delivers unmatched long-term ROI for Indian businesses.
- Company corporate PAN and TAN (TAN is required to deduct and deposit quarterly TDS).
- Your EPF and ESI registration details.
- The specific locations and states where you employ staff, to map Professional Tax (PT) and Labour Welfare Fund (LWF) slabs.
- A corporate bank account details to set up direct salary deposits.
- Detailed employee profiles: PAN, Aadhaar, bank accounts, and existing Universal Account Numbers (UAN).
- Year-to-date prior payroll records (gross salary, EPF contributions, and TDS deducted) if you are switching systems in the middle of a financial year.

Getting around the dashboard
The left navigation menu of Zoho Payroll serves as your administrative map. The main modules include:
- Dashboard: Provides a real-time summary of upcoming pay cycles, active headcount, monthly payroll costs, and pending approvals.
- Employees: Handles employee onboarding, department listings, salary template assignments, and portal activations.
- Pay Runs: The core processing area where monthly salary sheets are generated, edited, and approved.
- Approvals: Manages workflow approvals for salary revisions, investment declarations, and reimbursement claims.
- Taxes and Forms: Tracks monthly TDS liability, generates challan details, and compiles Form 24Q and Form 16.
- Loans and Giving: Processes employee loans, salary advances, and tax-exempt charitable donations.
- Documents and Reports: Stores company policies, employee folders, and outputs statutory summaries.
- Settings: The administrative panel where you configure locations, statutory parameters, and integrations.
Step 1: Set up your organisation
Open Settings and select Organisation. Start by entering your legal corporate name, address, corporate identity numbers, and PAN. Next, establish your Work Locations. Mapping locations is a critical step because state-specific compliance, such as Professional Tax and the Labour Welfare Fund, is determined by the state where an employee is registered. Finally, set up your designations and departments, and upload your company logo under Branding so it renders correctly on employee payslips.
Step 2: Configure statutory components
Still under Settings, navigate to Setup and Configurations and select Statutory Components. Here, you will configure the rules for EPF, ESI, Professional Tax, Labour Welfare Fund, and Statutory Bonus based on Indian labour laws.
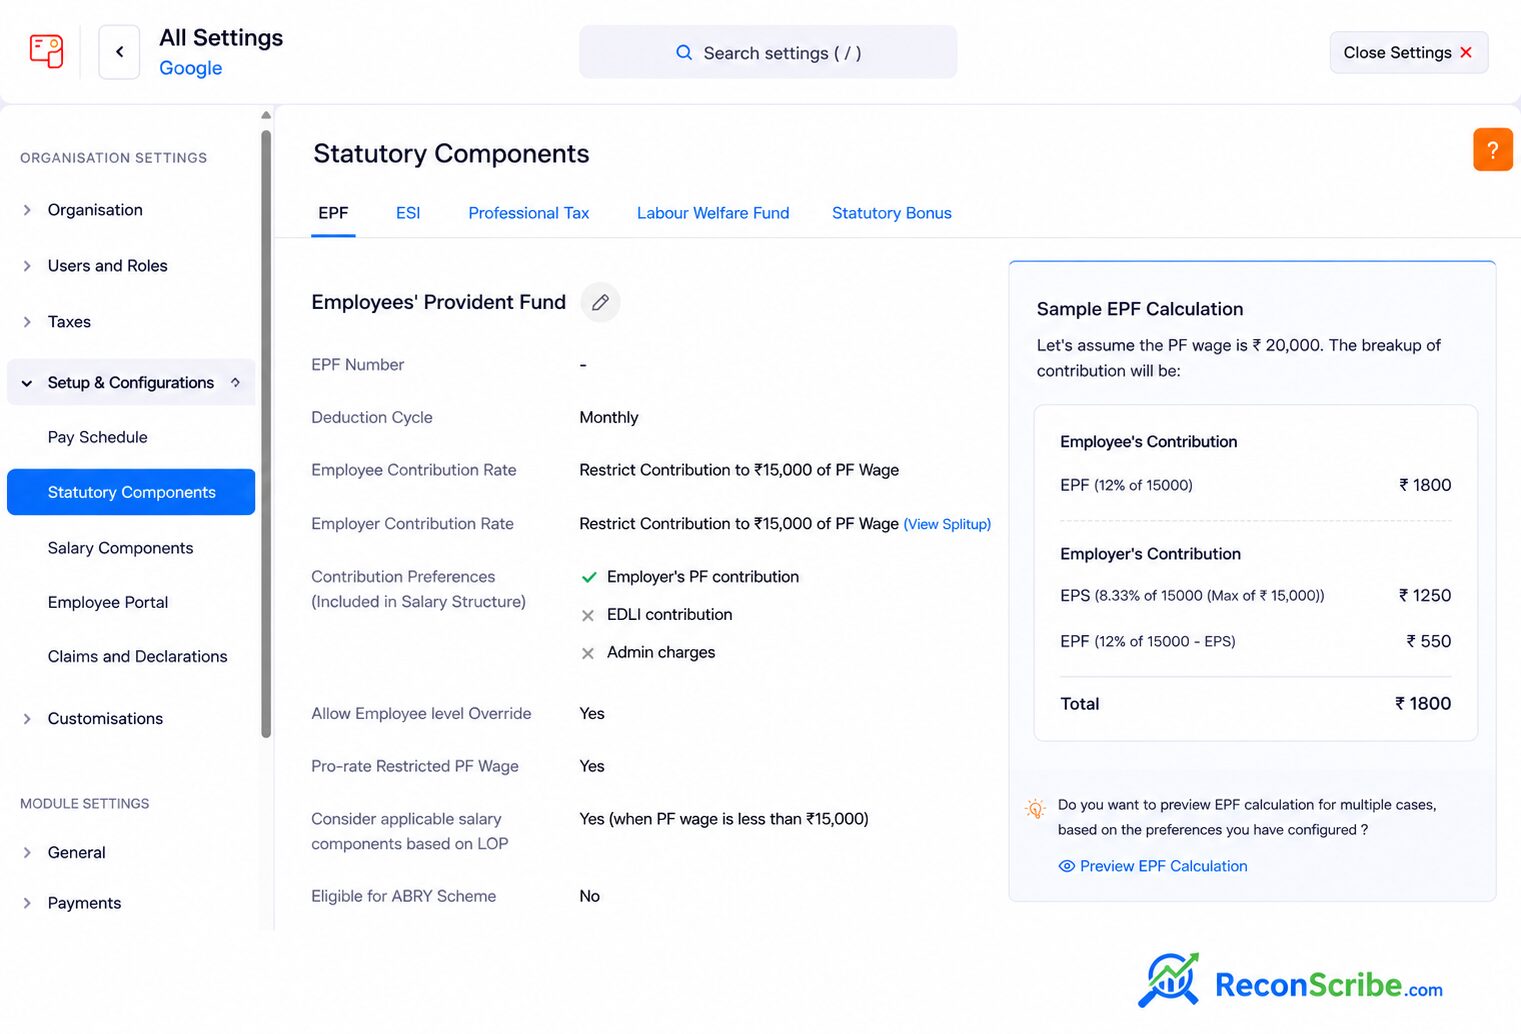
EPF (Provident Fund)
The Employees Provident Fund deduction is processed on a monthly cycle. Under standard rules, both the employee and the employer contribute 12% of the basic salary (PF wage). To keep payroll costs structured, you can opt to restrict the contribution to the statutory wage ceiling of Rs 15,000, which caps the monthly contribution at Rs 1,800. Under this cap, the employer share is split: 8.33% (up to Rs 1,250) is allocated to the Employees Pension Scheme (EPS), and the remaining balance (Rs 550) is deposited into the Provident Fund (EPF). Additionally, the employer must cover a 0.50% administration charge on the total PF wages, subject to a minimum of Rs 75 for periods with no contributions or Rs 500 otherwise. During setup, you can decide whether the employer PF share is integrated inside the employee CTC or treated as an additional expense on top of it. You can also customize pro-rating for loss-of-pay days.
ESI (Employees State Insurance)
ESI provides medical cover and applies to employees whose monthly gross wages are Rs 21,000 or less. The employee contribution is 0.75% of gross wages, while the employer share is 3.25%. Once enabled, Zoho Payroll automatically applies ESI to eligible profiles and stops the deduction once an employee monthly gross wage exceeds the threshold.
Professional Tax
Professional Tax is levied by state governments and is set per work location. The system maps the employee to the relevant state slab based on their location, with the total deduction capped by law at Rs 2,500 per year. Correct work location mapping in Step 1 ensures the system computes the exact deduction slab.
Labour Welfare Fund
LWF is a state-specific fund where both employees and employers make contributions on a monthly, half-yearly, or annual basis. The rates vary widely. For example, Delhi mandates a fixed half-yearly contribution of Rs 1.00 from the employee and Rs 2.00 from the employer. Haryana requires a monthly contribution of 0.20% of gross salary for the employee (capped at Rs 35.00) and an employer contribution equal to twice that amount. Ensure LWF is turned on only for the locations where your company is registered.
Prerequisite Rules for Employee Loans
Concessional or interest-free loans given to employees are generally treated as taxable perquisites under Indian tax laws. When setting up employee loans under the Loans tab, you can specify the disbursement date and select the corporate account for the payout. Zoho Payroll automatically tracks perquisite tax computations. If a loan is for specified medical treatments or if the aggregate outstanding principal is under Rs 2,00,000, you can check the box to exempt the loan from perquisite calculations in accordance with Rule 15(5) of the Income Tax Rules.
Step 3: Set your pay schedule
Navigate to Pay Schedule under configurations. Select your monthly pay cycle (such as the 1st to the 30th), your pay frequency, the first pay period you intend to run, and the payday (such as the last working day of the month). This schedule locks in the pay cycles, calculation periods, and due dates, so ensure it aligns with your corporate policies before saving.
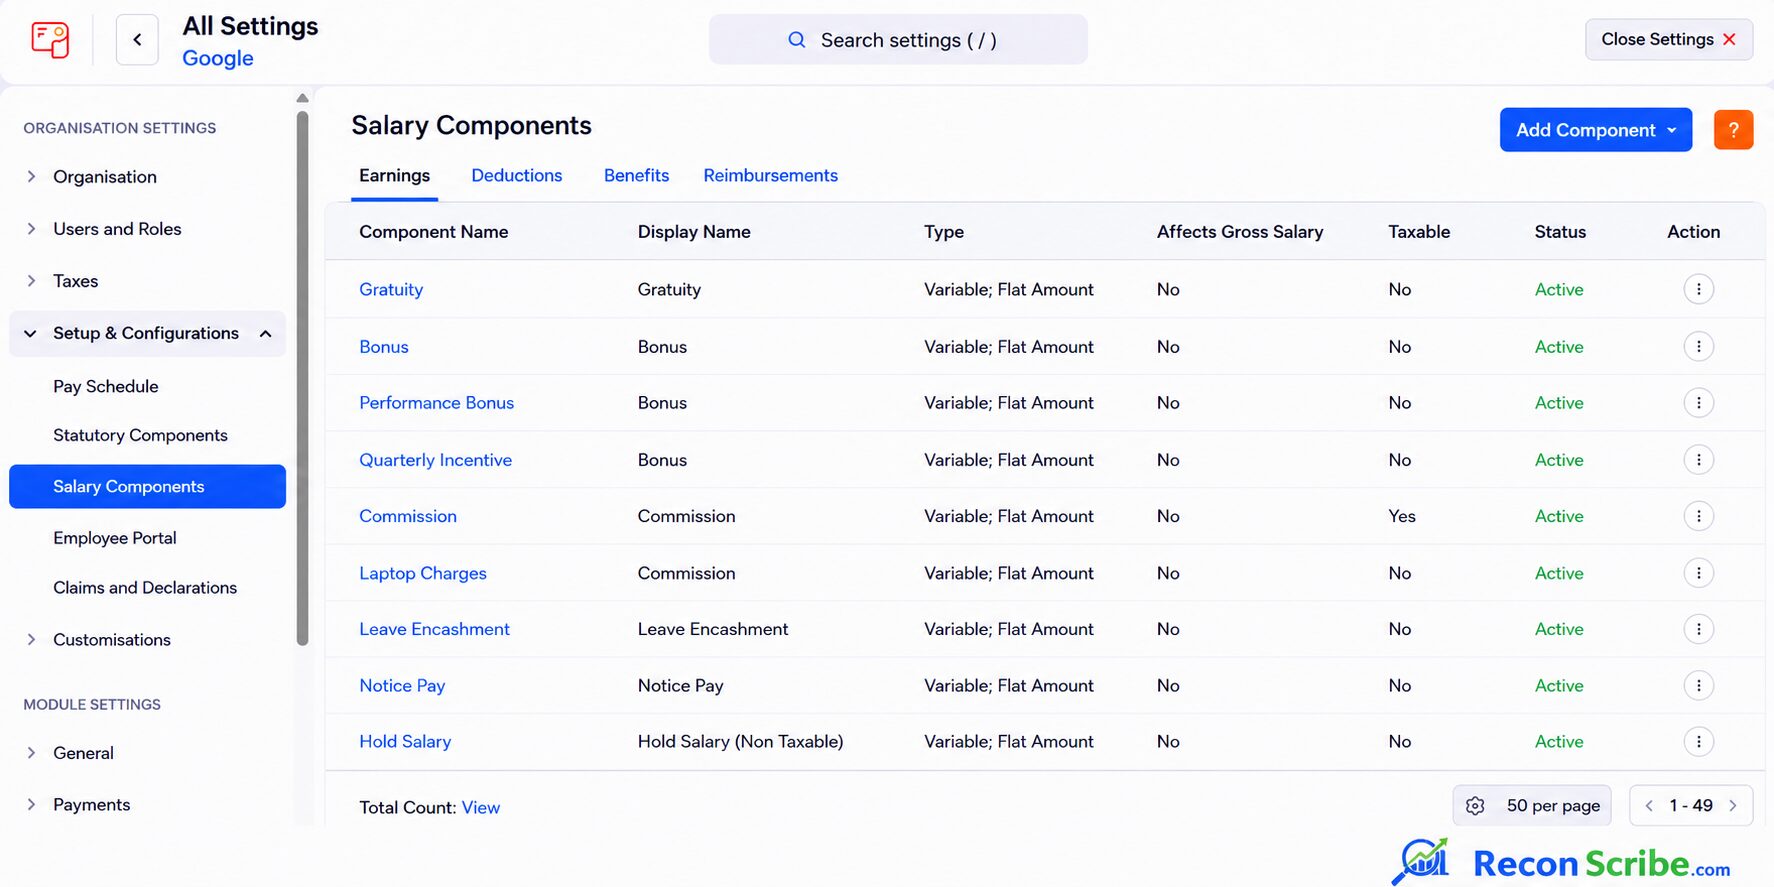
Step 4: Build salary components and templates
Open the Salary Components panel to define your pay structure. Set up your earnings, including Basic Salary (typically structured at 50% of the overall CTC), House Rent Allowance (HRA, usually mapped as 50% of the Basic Salary for metro locations or 40% for non-metros), and custom allowances like Mobile Allowances, Leave Travel Allowance (LTA), and Bonuses. You can configure each component calculation type: a percentage of the CTC, a percentage of the Basic salary, or a flat fixed rate. Once components are established, create Salary Templates to group these rules. Instead of manually entering components for every employee, you can assign a template (such as an EPF-inclusive structure) to profiles in bulk, saving administrative time.

Step 5: Enter your tax details
Go to Settings, select Taxes, and open Tax Details. Start by entering your company PAN and TAN. You will also need to input the TDS Circle / AO Code, which follows a standard format (three letters, two letters, three digits, and two digits) to specify your assessing officer’s jurisdiction. Under the deductor information, select your deductor type (such as Employee or Non-Employee), choose the primary deductor name, and record the deductor father’s name. These details are embedded in challan files and quarterly tax returns, so they must match your official tax registration records exactly to prevent filing rejections.
Step 6: Add your employees (Zoho People Integration)
If you operate within the Zoho ecosystem, employee onboarding is highly automated. By connecting Zoho People with Zoho Payroll, the system synchronizes demographic data, work locations, email IDs, departments, and job titles automatically every 24 hours. If you make immediate additions or updates to your staff registry, you can pull those changes instantly using the Instant Sync button on the Employees tab. The system maintains a complete Sync History log recording added, updated, deleted, or failed entries to verify data sync status. This integration removes the need for duplicate data entry, reduces keying errors, and keeps HR registry profiles and payroll ledgers aligned. If you do not use Zoho People, you can add profiles manually using the onboarding form. You will need to enter personal details, locations, assign a salary template, input bank details, and record statutory information like UAN, EPF status, and Professional Tax mappings.

Step 7: Add prior payroll if you are switching mid-year
If you transition to Zoho Payroll in the middle of a financial year, you must upload prior payroll records. Under this section, input the year-to-date earnings, EPF contributions, and TDS deductions for each employee from the preceding months. If skipped, the system will compute TDS from zero, leading to incorrect tax deductions and errors on the final Form 16.
Step 8: Turn on the employee self-service portal
Under Setup, enable the Employee Portal. This allows your staff to log in, download payslips, submit investment declarations under Section 80C or 80D, compare their tax liabilities under the old and new regimes, and upload reimbursement proofs. The claims are routed to administrators for verification before being factored into salary computations.
Approvals and Claims Configurations
The system routes employee portal submissions to the Approvals module. Administrators can manage these through three distinct sub-menus:
- Reimbursements: Verifies and approves custom business expense claims submitted by staff.
- Proof Of Investments: Reviews scanned investment proofs and receipts uploaded by employees before final tax calculations.
- Salary Revision: Authorizes salary revisions or CTC adjustments before they take effect in the monthly pay run.
Under Claims and Declarations settings, you can manage the locking status of declarations. At the start of a fiscal year, the Income Tax Declaration is locked to prevent modifications until you select the Release IT Declaration button. You can also configure general preferences, such as checking the box to Allow employees to switch tax regimes or allowing TDS modifications to exceed the calculated tax amount if staff request extra tax withholding.
For reimbursement claims, you can configure the submission window by selecting the last day of each month (such as Day 1) on or before which employees must submit their bills. You can also set automatic email alerts to notify employees when the last day to submit claims is changed, when claim submission is released, or when it is locked.
For businesses that manage employee travel and business expenditures, integrating Zoho Payroll with Zoho Expense allows approved expense claims to flow directly into the monthly payroll cycle as non-taxable reimbursements.
Under the Proof of Investments settings, specify the month from which approved POI amounts will be processed in payroll (such as February onwards) to calculate and deduct income tax in subsequent runs. You can also configure preferences such as allowing employees to switch tax regimes, allowing TDS modifications during payroll, mandating investment proof attachments for POI submissions, and mandating reviewer comments for partial investment amount approvals to maintain a clear audit trail.
Step 9: Set up salary payments
Under Payments, configure Direct Deposits to connect your corporate bank account. Alternatively, you can configure payouts directly from the Zoho dashboard without switching to external bank portals by setting up Payouts by Zoho Payments to automate bank transfers upon pay run approval.
Step 10: Run your first pay run
Navigate to Pay Runs to start a monthly cycle. The system pulls employee data, attendance details, salary templates, and tax declarations to compute gross earnings, statutory deductions, benefits, and net payouts. The interface provides a comprehensive breakdown of the overall payroll cost, total net pay, benefits, and tax deductions. You can review employee summaries, adjust individual earnings like bonuses or allowances, and double-check net pay computations. Once verified, submit the pay run for approval, release the direct deposits, and publish the payslips to the employee portal.
Step 11: Handle taxes and forms
Under Taxes and Forms, manage your monthly and quarterly tax compliance. Here, you can track your monthly TDS liability, compile details to generate TDS challans, file quarterly Form 24Q returns, and issue annual Form 16 certificates to your employees.
From the employee self-service portal, employees can access their tax documents under the Payslips & Forms tab. By selecting the relevant financial year, they can view and download their monthly Payslips and corresponding TDS Sheets (which show a detailed step-by-step tax calculation for that month). They can also view the Form 16 status panel, which allows them to download the certificate once it has been generated and released by the employer at the end of the year.
Zoho Books Integration Configuration
To automate your company accounting, configure the Zoho Books Integration under the settings panel. Every time you approve a pay run or record a transaction, a corresponding journal entry is posted automatically. Configure the following integration fields:
- Bank Account: Select the default corporate bank account from which employee payments are made.
- Banking Module Recording: Choose between Individual (each employee payment is recorded as a separate transaction) and Group (all employee payments are grouped together as a single transaction) to dictate how bank statements are reconciled.
- Journal Posting Preferences: Select whether journal entries are posted on an Accrual Basis (posted on the pay period’s end date) or a Cash Basis (posted on the actual payment date).
- Journal Status: Choose whether to post entries as a Draft (requiring an accountant to review and publish manually in Zoho Books) or Published (directly writing to the ledger).
Reports and Document Management
Auditing and compliance tracking can be handled through these dashboard modules:
- HR Document Vault: Manage document folders with a default storage capacity of 1GB per 100 employees. Separate documents into the Org Folder (for company-wide policies, holidays, and handbooks) and individual Employee Folders (for signed agreements and salary letters).
- Giving (Donation Campaigns): Set up active donation campaigns under the Giving tab. This enables employees to opt-in and contribute a portion of their monthly earnings to specific social causes directly from their payroll.
- Reports Centre: Generate and export 39 distinct reports. Group them into Payroll Overview Reports (Payroll Summary, Monthly Salary Register, Employee Salary Statement, Employee Pay Summary, Payroll Liability Summary, Leave Encashment Summary, Loss of Pay Summary) and Statutory Reports (EPF Summary, ESI, Professional Tax, and LWF registers).
Common mistakes to avoid
- Mapping work locations to the wrong state, which leads to incorrect Professional Tax and LWF deductions.
- Omitting prior payroll details during mid-year migrations, which distorts quarterly TDS calculations and Form 16 reports.
- Not deciding whether the employer EPF share is inside or on top of the CTC structure before enqueuing employees.
- Missing statutory deadlines for TDS deposits and Form 24Q filing.
How payroll links to take home pay and TDS
The deductions configured in Zoho Payroll determine the final in-hand take-home pay of your workforce. To simulate how a specific CTC structure affects net salaries, use our take-home CTC calculator. To verify standard TDS rates for contractors and professionals, see the TDS rate calculator, and to calculate interest on late filings, use our TDS late fee and interest calculator.
If you do not have an account yet, you can sign up through our referral link below. Your new account gets Zoho wallet credits to start with.
Don’t have time to set up Zoho Payroll yourself? Or maybe you need a real expert and don’t want to take chances?
Our compliance and accounting experts can handle your complete payroll setup, location-specific statutory mapping (EPF, ESI, Professional Tax, LWF), Zoho Books integration, and employee portal configurations. Fill out the quick form below for a setup consultation.
Official documentation: Zoho Payroll help (India).
This guide is for general help and is based on the Zoho Payroll screens and documentation. Product screens and statutory rates can change, so confirm details in the official Zoho Payroll help and with a qualified professional before you rely on them.